Generate for Requests Widget
This widget is used by managers and HR admins to generate documents requested by employees using the Send as Requests Widget. HR admins and/or managers will see a list of requested documents from employees. They can filter the list of requested documents by name, date, department, division.
Follow the steps below to know how to create this widget.
Creating Generate for Requests Widget
- Click Actions and then click Add Widget.
- Choose Generate for Requests as the Widget Type and then fill in the necessary fields. Then click Save.
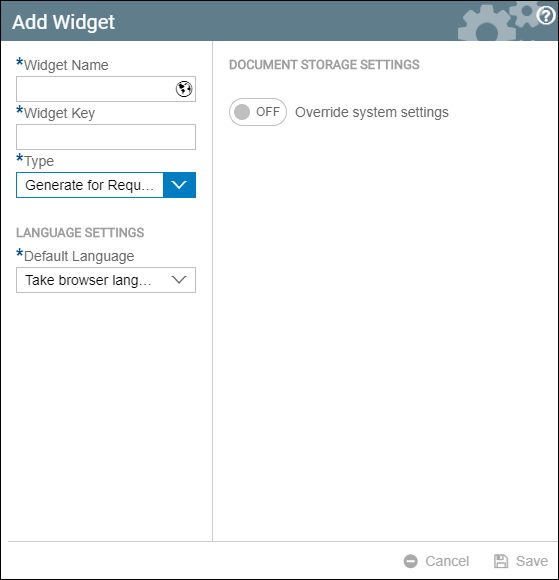
- Your created Generate for Request Widget should look similar to this one. All requests that are sent will be available to this widget for generation.
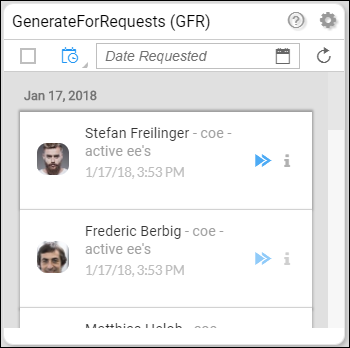
Date Displays the date when the latest document was requested. Employee name and photo Displays the name of the employee along with his/her photo (if available). Document name This is the one beside the name of the employee. In the example above, the document name is coe - active ee's Date and time of generation Shows the exact date and time when the document was requested Generate This is the blue double arrowhead at the right. Clicking this would generate the requested document for that person. View details This is Information "i" button beside the generate button. Clicking this would show details about the employee. This should look like this.
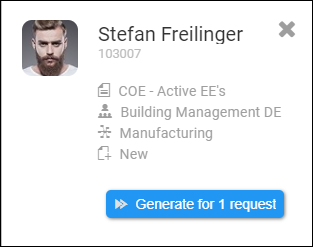
It displays the name of the document, the department where the employee belongs, the division where the employee belongs, and the status of the document. Lastly, there is also a generate button.
- There will be an option to filter the requests using the following:
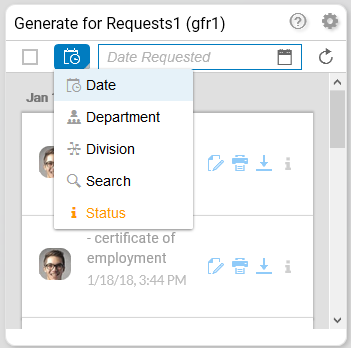
- Filter by Date
- Filter by Department
- Filter by Division
- Search using Name
- Filter by Status
- You can choose your desired generation options and then click Generate.
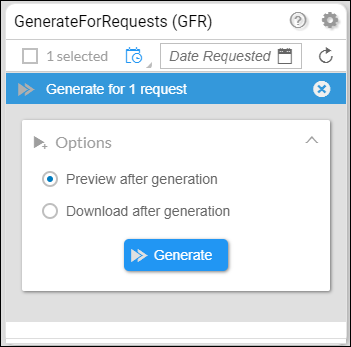
- Preview after generation - this will give an option for users to preview the document right after the generation.
- Download after generation - this will give an option for users to download the document immediately after generation without previewing it.
Refresh button
Once you are done generating, downloading, and printing your documents, there is a refresh button to refresh the documents in your requests list widget to only show documents that are not yet processed.
Example:
This is the Generate for Requests Widget. (Notice that the requests are identical but have different times. We will use the first request with the 4:52 timestamp.)
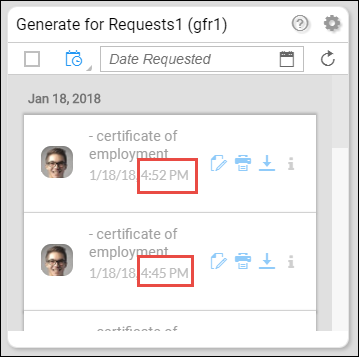
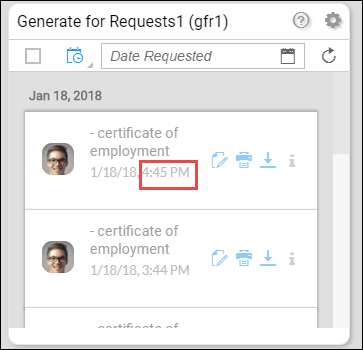
Now, after clicking view, print, or download, followed by the refresh button on top, the widget would look like this. (You will now notice that the first request is now the one with the 4:45 timestamp.) This is because the request with the 4:52 timestamp has already been processed.
All requests that are already downloaded or printed will no longer be displayed after refresh, unless user will filter the request by status.
To generate documents, read Document Generation - Generate for Requests Widget.